What should you be able to do by the end of this post?
This post is to provide readers with the basic concepts of how to install Kali Linux on a USB then demonstrate how you can boot the USB from both a Windows laptop and a Macbook Air. You can apply the same technique on any Mac however, booting into the BIOS on a Windows PC will differ from manufacturer to manufacturer.
Why would you want to create a bootable USB with Kali Linux?
· You have used all of your system resources i.e. RAM, CPU
· There is not enough memory on your hard drive
· You can run this bootable USB on any device
What do you need to get started?
First, you’ll need a program to install Kali on your USB drive and make it bootable. I have used Balena Etcher in today’s video, any other OS imaging software will also work
Download the Kali Linux Live 64 bit image, this is the .ISO image we will burn onto your USB. Once you have downloaded it, if you are using Etcher, select ‘Flash from file’ and find the .ISO image you downloaded, select the USB you have plugged in then select on Flash. Refer to the video at the top of this post for help.
How do you boot the Kali USB from Mac?
1) Restart Mac and hold down Command (⌘)-R when you hear the Apple chime
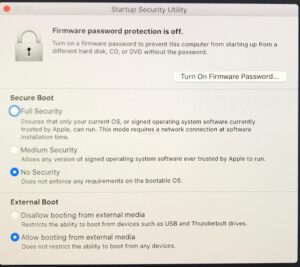
2) Enter administrator password for your Mac then select Utilities from the top menu then select startup security utility.
3) From here, you will need to select No Security and then Allow booting from an external device, these settings will then allow your Mac to boot from an external device and boot an operating system that is not trusted by Apple.
4) Click on the Apple icon to restart your Mac, hold down Command (⌘)-R on the Apple chime, this will now allow you to choose the EFI boot drive with your Kali Linux Live image
5) Connect your Mac to wifi and you will then be prompted with the Kali Linux startup menu, choose the Live Mode then enter and it will then boot into the Kali Linux desktop.
Note – booting on a Mac-based laptop will require an external keyboard or mouse which might be frustrating, please see this article for further information.